
We're wrapping up our historical school supply series with the third item, a hornbook, to complete the set. A hornbook was a teaching aid consisting of a leaf of paper showing the alphabet, and often the ten digits and the Lord’s Prayer, mounted on a wooden tablet and protected by a thin plate of horn. You can look up images of them online – they all look so neat!
A girl like Felicity in 1774 would have had a hornbook in her family to help her learn how to read. Follow along as we make one! There won’t be any actual horn on the supplies list, but we think your doll will like the finished product.
Supplies:
-
Ivory computer paper
-
Scraps of faux leather or vinyl (can be bought easily in most fabric/craft stores) (alternatively you could use brown card stock)
-
Scissors
-
Stick glue
-
Ruler
-
Pencil
-
9 inch length of leather cord or ribbon
-
Sewing machine and dark brown thread
-
Computer to make and print text on paper

Let's Get Started!
Step 1: The first thing you need to do is design the text of your hornbook. We made a text box that was 1.75 inches tall by 1.25 inches wide. Inside this box we typed out the letters of the alphabet in all caps, then divided with a straight line, then typed out as much of the Lord’s Prayer as we could fit! Our font size for the alphabet was 8 points and for the Lord’s Prayer was 6 points. So small! Then we copied this text box a few more times and printed them out on our ivory computer paper. The extras are in case we mess up when we cut them out!


Step 2: Using the bottom corner of the paper you printed your text on, draw a hornbook shape to use as a pattern piece. The main part of our hornbook shape is a rounded rectangle 2 3/8 inch by 1 ¾ inch, with a rounded handle piece sticking out that is 5/8 inch long by 7/8 inch wide. Draw your own hornbook shape and cut it out.

Step 3: Using your drawn pattern, cut out two pieces of the faux leather. Use your stick glue to glue them together.

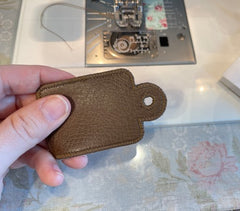
Step 4: Using your brown thread and your sewing machine set to a zig zag stitch, slowly and carefully stitch around the edge of your faux leather sandwich. We set our zig zag stitch settings to 0.85 stitch length and 3.0 stitch width. We stitched all the way around two times.

Step 5: If you are using cardstock to make your hornbook, use a hole punch to punch a little hole in the rounded handle. If not, use small sewing scissors to cut out a circle in both layers. Carefully use your sewing machine again to zig zag stitch around this circle two times.

Step 6: Cut out one of your text boxes and trim to size, then use the stick glue to glue the paper to the center of the hornbook. If you mess up, just start over with one of your extra text boxes. You can cut rounded corners on your paper or angled corners like we did.

Finally, use the 9 inch length of leather cord or ribbon and lace it through the hole, then tie in a knot. This is the finishing touch to make it look like a true historical hornbook!

Now that you have made all three items from our historical school supply series, your historical doll from 1774 will be ready for her reading and writing lessons!
@forofsuch, for Pixie Faire
PS. Find the other two tutorials to make 1774 school supplies here: Copybook and Inkwell

3 Comments
Leave a comment


cheryl
December 30, 2022
I am so thankful for all of you. You are so generous. I can’t believe all the beautiful patterns and helpful tutorials you give away. I can’t wait to make this little Hornbook. Thank you!!