Clipping 101: Basic Clipping Skills

Clipping is one of the simplest, easiest ways to take your sewing up to the next level of professionalism! Sadly, it's often overlooked, or given a very brief explanation. So, today I wanted to show you three professional clipping techniques. 


Before we get too far, here's a quick definition: clipping is simply any cut into the seam allowances, resulting in a flatter seam. Now...get your scissors, and let's get clipping!


Lesson 1: Clipping concave curves

This neckline is a great example of a concave curve, or a curve that goes inward. You can also find concave curves in princess seams, facings, and armholes. 

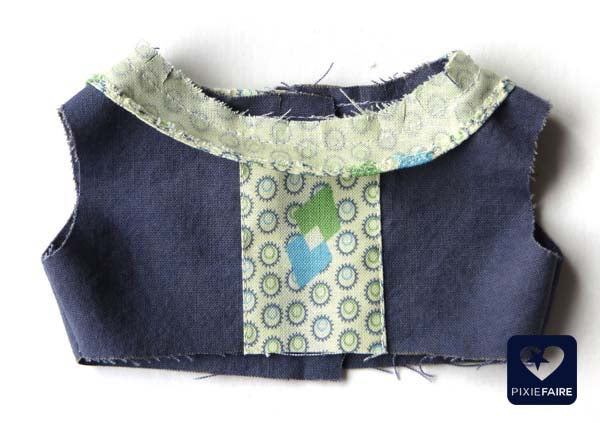
I've sewn a little tiny facing to this neckline. It's not an extreme curve, but you can already tell if I were to just turn it right side out, there would be some serious puckering on the right side. Nothing says sloppy sewing like a puckery seam!

Here, you can see the correct clipping technique for concave curves: tiny little slits, cut in the seam allowance, just up to the seamline (but not past!) The more extreme the curve, the more slits you'll need.

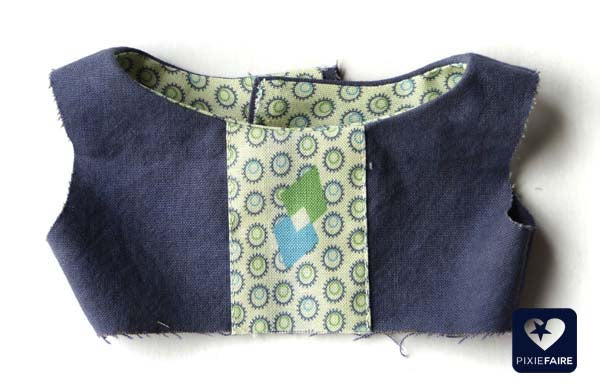
Look at how pretty that clipped, pressed seam is!


Lesson 2: Clipping Convex Curves

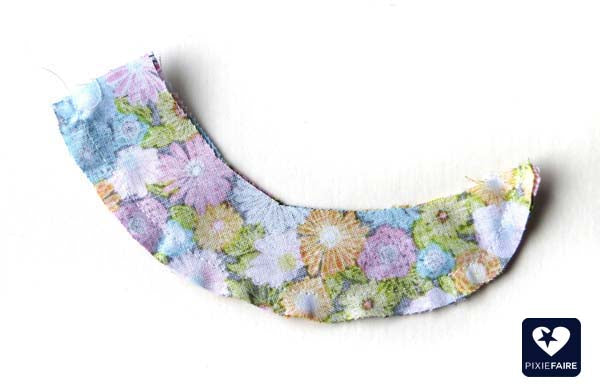
For this example, I've sewn up a little half collar. Its outer edge is a convex curve -- because the seam allowance is wider than the inside of the collar, the seam allowance wants to buckle up on itself. 

So, you have to remove some of the seam allowance by cutting little notches. The black triangles below mark good places to clip out notches.

The result? A professional-quality, smooth curve!

Lesson 3: Grading Bulky Seams

Grading is a little different, but it also helps your finished seam lie flatter. Any time you have lots of layers coming together, it's a good idea to cut your seam allowances to differing lengths -- to grade them. Essentially, you want a stair-step look to your seam allowances.

This example shows a two-layer skirt, gathered onto a bodice piece, with a binding strip! That's four layers, and some of them are even gathered... Trimming them to different lengths will keep the seam from becoming a lump in your garment, while still preserving the strength of the seam.

To grade all the layers at once, turn your scissors at an angle; clip the top seam allowance rather short (leave just enough that it won't pull out of the seam), then clip the next layers a bit taller, and leave the lowest layer longest of all.

Now, when you press and stitch the binding up, you have a much less bulky seam. (And yes, it can be just as sturdy as if you'd left on all the seam allowance!)


Congratulations! You've finished Clipping 101! 


Have you been clipping for years? Or is this all new to you? I'd love to hear about your adventures in clipping, in the comments...


--Melinda


35 Comments

Brenda N.
Brenda N.

April 15, 2017

Wonderful tips for the novice sewer! Another method (besides under stitching that Linda C. AZ mentioned) that can be used to prevent facings for instance from rolling over is the ‘stitch in the ditch’ technique where you sew the seam line, grade or clip, press, then do a small stitching line from the right side (of the fabric) in the seam line that was stitched. (May sound confusing but it really isn’t … ☺… plus it is also a great way to finish off any hand stitching that you might want to conceal. Last but not least ; ‘blending your stitches’ on seam allowances using the tip of your iron prior to pressing also gives you a professional finish.

Brenda N.
Brenda N.

April 15, 2017

Wonderful tips for the novice sewer! Another method (besides under stitching that Linda C. AZ mentioned) that can be used to prevent facings for instance from rolling over is the ‘stitch in the ditch’ technique where you sew the seam line, grade or clip, press, then do a small stitching line from the right side (of the fabric) in the seam line that was stitched. (May sound confusing but it really isn’t … ☺… plus it is also a great way to finish off any hand stitching that you might want to conceal. Last but not least ; ‘blending your stitches’ on seam allowances using the tip of your iron prior to pressing also gives you a professional finish.

Kat
Kat

November 18, 2016

I had been shown how to lessen bulk in a waist, etc., but forgot after my accident. I sustained a concussion and had to learn to reuse my sewing machine, and sewing, to talk, and retain knowledge. So I started sewing 18" doll clothes.

Thanks for sharing your knowledge and your patterns.

Kat Jakee

Louise
Louise

July 07, 2016

This waistline finish would look nice to the outside as well.

Sylvia
Sylvia

April 04, 2016

I have always done notches and more recently pinking but was always afraid that grading the seam would weaken it. Thanks for giving me the confidence that it will be fine. Great tutorial. Oh and yes…I always press as I go. Makes the difference between looking home made and being hand made. Thank you

Sylvia
Sylvia

April 04, 2016

I have always done notches and more recently pinking but was always afraid that grading the seam would weaken it. Thanks for giving me the confidence that it will be fine. Great tutorial. Thank you

Linda C. in AZ
Linda C. in AZ

October 09, 2015

Pinking shears are wonderful! After grading and clipping seam allowances, I also understitch my facing. This technique makes the facing naturally roll to the underside. I have also seen the use of bias strips/tape and topstitching on both girl’s and doll clothes around the neck and arm edges.

Susan
Susan

March 31, 2015

Thanks so much for another very helpful tutorial.

Carol
Carol

June 15, 2014

I purchased a small iron from the craft department of my local department store to sue for pressing open seams and such for when I am making 18" doll clothes. Like many I learned the grading technique, clipping curves and to always press as you go along in home economics class when in middle school when all girls had to take this and learn the basics of cooking and sewing. Great reminder.

Carol
Carol

June 15, 2014

I purchased a small iron from the craft department of my local department store to sue for pressing open seams and such for when I am making 18" doll clothes. Like many I learned the grading technique in home economics class when in middle school when all girls had to take this and learn the basics of cooking and sewing. Great reminder.

Brenda
Brenda

May 22, 2014

I wish I had learned about grading bulky seams long ago. Thanks so much for sharing. I will definitely be using this method from now on.

Melinda
Melinda

May 21, 2014

So glad this is helpful! I love the tip about using pinking shears to cut notches in convex curves — that sounds like a real time saver!

Karen
Karen

May 09, 2014

Enjoy reading your tips. I sew 18" doll clothes so do a lot of clipping on armholes and necklines but recently I use my pinking shears and cut close to the seam which works great for me. Probably do this method more than clipping.

Susan Rees
Susan Rees

April 23, 2014

These were taught to me in home quite a few years ago – clip, grade and press. It really stuck with me.

Christie
Christie

April 21, 2014

I’ve been clipping for years but sadly, grading is brand-new to me! So glad I decided to read this. Thanks!

Amanda
Amanda

April 18, 2014

I was clipping the corner of a lined bodice once and accidentally cut halfway into the back piece with my big scissors and ruined the top. >.< Needless to say, I immediately went out bought a pair of small clippers for the job. Haven’t ruined a top since! :D

 Linda
Linda

April 18, 2014

Thanks for the reminders. Sometimes we just are sewing to fast to remember the steps. Thanks again!!!!! Love this site!!!

Darlene Crawford
Darlene Crawford

April 18, 2014

Great sure needed this

Suzanne Dahl
Suzanne Dahl

April 17, 2014

Always! It makes for a much neater, flatter curve. Thanks for layered clipping tip!

Kittie
Kittie

April 15, 2014

As a retired seamstress and because I do not have a serger; I always cut and/or grade all my seam allowances using pinking shears. Not only does it help with bulky seams, it helps prevent unraveling also. Another tip for really professional looking results is to use your iron and press seams as you go. That step is so often overlooked and it really makes a big difference in the finished product.

Marge R (mer)
Marge R (mer)

April 15, 2014

Great tips — been doing them for years, but now we have a fabulous reminder w/photos! LOVE the final tip on grading — can use that one very soon for sure — thanks for sharing!!!

Bev
Bev

April 14, 2014

I love all the Hints, I hope this is going to be a on going thing.
I have a folder for all the hints I read.
I now have one from Pixie Faire.

Thanks a bunch
Bev in Ohio

Connie Van Der Hart
Connie Van Der Hart

April 14, 2014

I have sewn for over 50 years and was taught the clipping in my high school home economics course. I wish sewing was taught today. I really appreciate hints as I feel new sewers have missed so many hints that was taught in the past. Please keep up the great work for all sewers. Thank you.

Jasmine
Jasmine

April 13, 2014

Clipping is still new to me, so this helped a lot! I rarely put notches in my collars, so they are always a little bulky.

Fran Stroud
Fran Stroud

April 12, 2014

Thanks for the refresher course. We all can use these tips.

Bobbi
Bobbi

April 12, 2014

If you’re careful you can use pinking shears for outside curves.

norma
norma

April 12, 2014

Thanks. Good advice.

Geralee Holmes
Geralee Holmes

April 12, 2014

How about just cutting the seam allowance in half? I believe Nancy Zieman teaches this, and that’s what I like to do many times. If I want the seams pressed open, then I would clip.
Thanks for the tutorial.

judierob
judierob

April 12, 2014

I too have been clipping for years but am very impressed by the step method of reducing bulky seams. Very useful tutorial.

Mardell
Mardell

April 12, 2014

I have been clipping for years and this is a good tutorial. There are no shortcuts to clipping. Once you start clipping and grading bulky seams you just won’t quit…the results are too important to the finished garment whether for a doll or yourself.

Stacy
Stacy

April 12, 2014

Thank you! I was cutting triangles out of all my concave curves and it just takes so long! This is so helpful! Thanks again for posting.

Motherp
Motherp

April 12, 2014

Great tutorial, just like my mother taught me. Thanks for sharing.

Margaret
Margaret

April 12, 2014

Have been doing the first 2 but thank you , the last jewel about the waist line will be my next project! Yay for helps!

corinathorne
corinathorne

April 12, 2014

Excellent article. I’ve been sewing a long time but a refresher is always a good idea.

kathi
kathi

April 12, 2014

I have been clipping for years;however I never really did “notches” in my collars. It does make sense, I will have to try that. Thanks!!

Leave a comment