
Finish out your Christmas decorating by making a gingerbread house!
It looks good enough to eat -- but it's really made from modeling clay and puff paint. :D

You'll also need some beads and stickers, for decorations.

Start by rolling out the clay, and cutting out house shapes. For a simple house, you'll want two fronts, two sides and two roof pieces. This house is about 2" square at the base, and 3" tall at the point of the roof. (It helps to make templates out of cardboard first, and check the fit and size of your pieces!)
Bake the pieces, following the directions on the package.
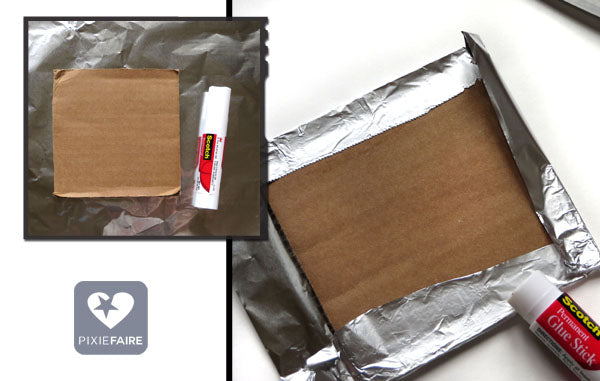
To make the base for your house, cover a small square of cardboard with foil.
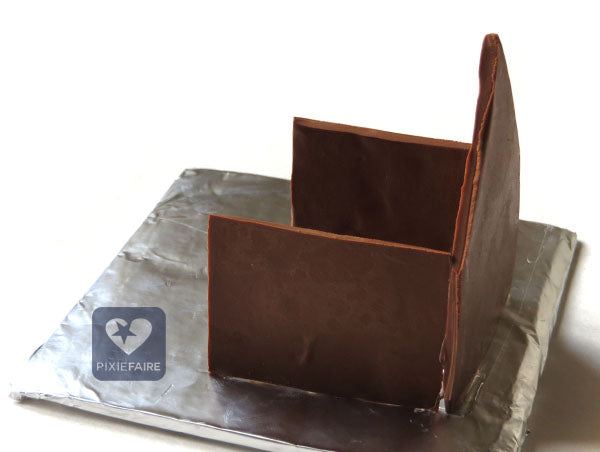
Then, hot-glue your house pieces onto the foil-covered base. Be sure to glue the pieces to each other, as well!
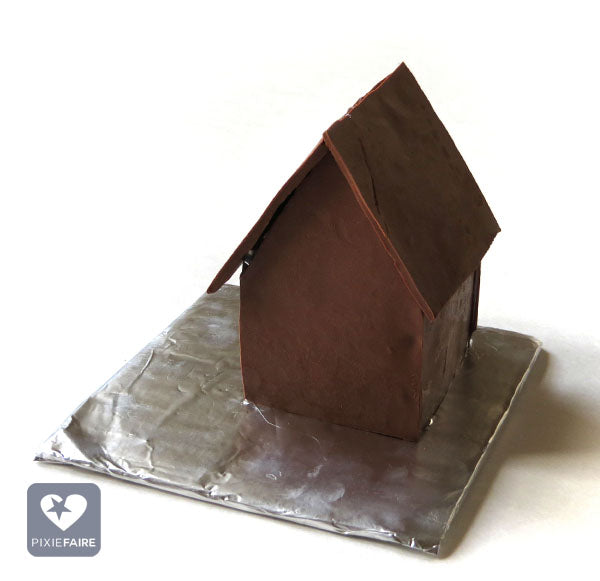
Get the front, back, and two sides glued down before adding the two roof pieces. It's ok if you have little gaps -- you can fill those in with puff paint in the next step.

Go over all your hot-glued seams with white puff paint, to make it look like the house is held together with icing.
If you want, you can go ahead and add "icing" decorations at this point -- or, if you're like me and don't trust yourself around wet puff paint, let it dry for a couple hours.
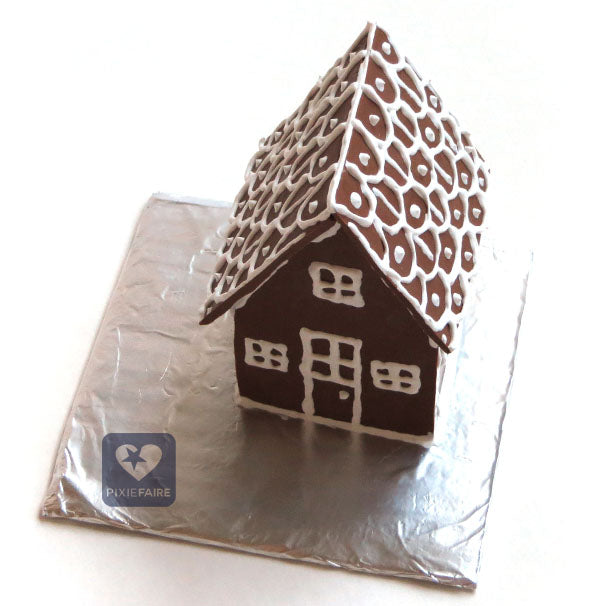
Draw on an 'icing' door and some windows; then decorate the roof. Here's a closeup of the roof pattern I did -- there are lots of other awesome patterns too, so get creative...

Once all that is dry, start landscaping! Hot-glue beads down all around the cardboard base to make 'plants'.

As you are landscaping, it's also a great time to add stickers to the house itself. See if you can't find some that look like your favorite candy!

Once you're done landscaping, draw on a puff-paint path, and add a final drizzle of puff paint to look like snow.

Set it in a safe place overnight, to give the puff paint a chance to harden up.

Have fun, and be sure to let us know in the comments if you make this!
For Pixie Faire,
Melinda


11 Comments
Anyone have suggestions on the specific brand stickers to use?
This is awesome. Thank you for sharing this tutorial. Where’s it been hiding? Looks like it’s been here 3 years already. I wish I’d seen this earlier in the season, but there’s really no rule against making gingerbread houses in January, right? Besides, looks like it might just last a bit to enjoy next Christmas, and the next….
Cute idea!
I’ve made real gingerbread houses (and will do one this year for the grands). Since my hands tend to be a little shaky, I do the decorating before putting the pieces together.
qui peut me dire ou trouver cette peinture feuillete
Thinking about what sizes the template pieces are———-just noted, you can count the squares of the cutting board the pieces lie on. My guess is the sides are 3"high x 4"wide—-etc