Hi Everyone! In Part 4, we wrap up the topic with a look at ways to complete the summertime look with the perfect accessories! There are a variety of things you can pair with your swimsuit to create a super cute ensemble set - A cover-up, sandals or slip-ons, a floppy sun hat, shorts, and, of course, the perfect tiny tote!
One of the trends I've seen popping up all over the place is the circular straw totes and purses - they're everywhere! I've seen them made with both straw or rope.

Many are done in a natural color but I've also seen some really cute colored styles, all one color or a swirl of combined colors - there are so many design ideas for this project! There are also a variety of sizes - large beach totes with short handles or tiny handbags with longer shoulder straps - really the possibilities are endless!

I immediately went to work to figure out how to make one scaled down in miniature and am excited to share this super easy pattern hack with you! It's a simple version creating a larger bag similar to a beach or market tote. The handles are short and made using the rope cording.
Follow along in the video posted below to see how to make this darling little tote! Are you ready? Let's go...
Watch The Straw Tote Pattern Hack video below:
This pattern hack is done using the LJ Halloween Treat Bag Pattern pattern pieces and a few simple modifications to the design.
- Instead of using felt to construct the body of the bag, I've used a twisted rope cording and a circular sewing technique to create a look that mimics a woven straw tote! I recommend 1/4" width (or narrower) cording and a lightweight stabilizer (tissue paper or a coffee filter work perfectly!)
- For the sides of the bag, I used 2" width Crocheted Cluny Trim, cut to the size of the Side Bag pattern piece.
- The assembly of the bag is the same as the original pattern - a hand-sewn blanket stitch, sewn with embroidery floss, that connects the side to the front and back.
- The only change in the bag design is that the strap itself is combined into the front and back pieces by leaving a 6-inch extension of the rope cording to create the handle.
Don't worry if this doesn't make sense as you read it! All of it is shown in the video below :)
Patterns Used For this Topic:
- LJ Free Swimsuit
- LJ Rashguard & Swim Shorts
-
123 Mulberry Street Gotchies (will be used for the part 2 sew-along demonstration) 18" size is being updated and 14.5" size will be published prior to the sew along.
- Patterns found in the Pixie Faire Swim Shop Collection
-
LJ Halloween Treat Bag (hmmm, maybe I should change the title to "The Cutest Tiny Handbag Ever!")
Week Four Task:
- Watch the tutorial video, follow along, and try it out! You could do this circular sewing technique with any type of cording - colored bags would be super cute!
- Check out the Ultimate Resource Guide for fabric and supply sources. (Find this in the SWC Bonuses section)
- Jump over the SWC Facebook Group for conversation and project sharing.
If you'd like a bit more instruction on how to sew the original treat bag design, and a closer look at sewing a blanket stitch, watch this video below (start at 1:28):
Looking for a super cute swimsuit cover-up?
Follow along in the free tutorial to see how we made this one using this clever pattern hack of the Free Liberty Jane T-Shirt pattern!
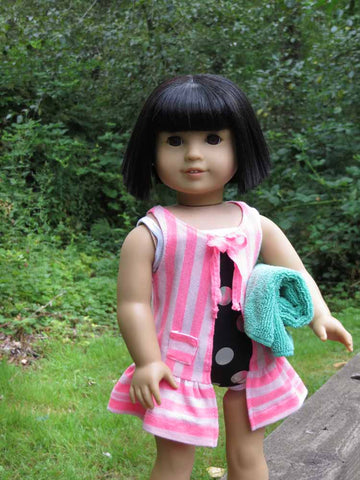
Today's tutorial is a super cute swimsuit cover-up! It features fun racer-back styling, a single tie at the front, and two tiny pockets. And the best part? All you need is an old t-shirt and the (free!) Liberty Jane Trendy T-Shirt pattern.


Cut a 2 1/2" wide strip off the bottom of your t-shirt, including the original hem, then cut out the fronts and backs as the pattern directs (you don't need the sleeves). The finished cover-up will open in the front, so for our purposes, we'll pretend the back is the front, and the front is the back. Got it? Let's go!

Next, we'll do some fancy trimming. Open up the shirt, and then refold it along the original front's fold line. Lay the two 'backs' (what will become our fronts) on top of each other, being careful to line everything up. You'll make three sets of cuts; refer to the picture below to see how big and where to make them.

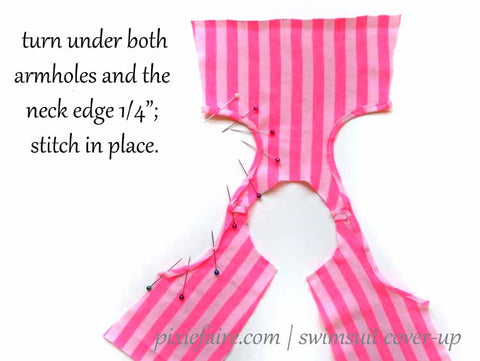
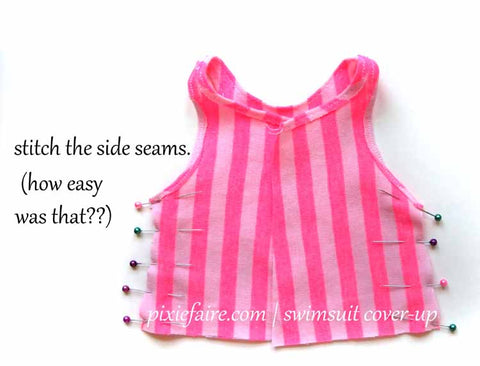
Then, re-open the top, and hem both armholes and the neckline. Once that's done, sew the side seams!


Next, take the 2 1/2" strip you cut off the bottom of the shirt. If you used the shirt's hemline, you can save yourself a step, as I did here; otherwise, take a minute and run a narrow hem along one long edge. Cut the strip so that it's 25" long -- or as close to that as you can get with your tee.

Finally, hem the front edges and add the ties and pockets.

Then, put it on your doll and let her have a blast!


3 Comments
Leave a comment


Teena Baucke-Rients
June 30, 2019
Your videos and projects continue to provide wonderful content that inspires and encourages—whether to try a new technique for the first time, or to just shake off the doldrums and get back into sewing. Really enjoyed this topic! :)