
Hi Everyone! In Part 2 of our straw hat topic, we are going to begin a series of projects where we will be experimenting with reshaping full-size straw hats to make doll-sizes straw hats. Follow Shari over the next three weeks to see how she uses one full-size ladies straw sun hat to make three different doll-size hats! In this first demonstration she will be using half of the brim from the ladies sun hat to make a simple Summery Sun Visor. Next week she will use the other half of the brim to make a Soft Crown Regency Bonnet. For her final project, she will show you how to reshape the crown of the sun hat to make a simple doll-size straw hat that can easily be transformed into a Victorian era Poke Bonnet!
Now let's get started on the Summery Sun Visor!
Summer Sun Visor Tutorial
The new Thimbles and Acorns Three Straw Hats pattern includes the pattern pieces for this project along with the full step by step photos and instruction. We encourage you to download the pattern (use your July coupon code found on the SWC Bonuses page), print out the pattern piece, and follow along as Shari demonstrates how easy it is to create this hat for your 18-inch doll.
If you're interested in resizing this hat to fit a different size doll, check out the How To resize A Hat Pattern For Any Doll post from the Hip, Hip, Beret topic.
For this project we will be using part of the hat brim to make the visor. This information was posted a few weeks ago, but if you haven't done this part yet, you will need to do this first.
More info on finding and preparing your Straw Hat
- You will need to procure and prepare a few specific supplies.
- There are some instructions below showing how to prepare your hat for use, but you can save those steps for later if you want to watch a video to see this done in more detail. For right now, we recommend you look for a hat to use! We found ours at Kohls for just $15, but you can look at places like Wal-Mart, Goodwill, Thrift shops, Garage sales, etc. Maybe even the Dollar Store!

-
Choosing Your Hat: After collecting an assortment of straw hats from thrift shops and department stores, I quickly learned that all straw hats are NOT created equal. Real straw hats can be reshaped to some degree, but they are not as pliable as hats made from paper raffia straw. Paper raffia straw hats are woven with thin strips of paper raffia that is often strengthened with a thin strand of polyester filament. These hats are usually lighter in weight and respond well to reshaping, especially those that don't have the polyester filament woven into them. Plastic raffia straw hats are similar to paper raffia straw hats - only plastic. These hats are not recommended for these projects because they won't stand up to the heat and steam used in
the shaping process.

- Consider all the characteristics of the hat you are working with as you decide on the style of doll hat you want to make. Look for different weaves and consider how they can be incorporated in your project. Depending on the style of straw hat you want to make for your doll, child size hat crowns usually work best for straw bonnets whereas adult size brims work better for most visor type hats. This is a great project to repurpose thrift shop or dollar store straw hats.
-
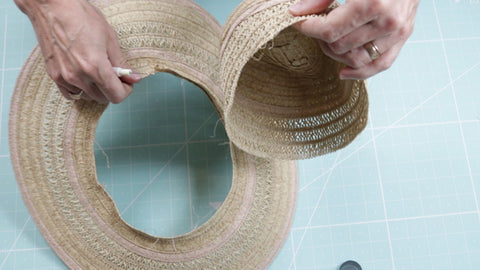
Preparing Your Hat: Remove the hat band and any embellishments from your hat.
Separate the crown from the brim by removing the stitching from the row of braid about 1/2” up from the brim. Most straw hats are sewn together with a looped stitch which can be undone simply by pulling the thread. If not, use a seam ripper to remove the stitching. Cut the braid to finish the separating.
-
Cleaning Your Hat: If your hat is soiled from use, take the time to gently hand wash the crown and the brim in warm soapy water. Rinse well. Lay the brim flat and allow to dry. The crown does not need to dry before starting the hat or bonnet project.
-
Saving Braid For Trim: Carefully remove a few rows of braid from the outside edge of the brim and the lower edge of the crown to trim the brim of the doll hat. You will need two 15” lengths each for the Summery Sun Visor and Soft Crown Regency Bonnet and two 18” lengths for the Poke Bonnet.
-
Choosing Your hat Mold: For this project I found that a 4” - 5” diameter Terra Cotta flower pot gave me just the right size and shape for the hat I wanted to make and the surface of the pot provided a solid surface to work on. (This is needed for the Poke Bonnet).
Similarly sized and shaped plastic containers, like yogurt or sour cream containers, also work well. I also found that stacking the container for my hat mold on top of a slightly larger plastic container worked nicely to raise my hat mold up off my work surface, making it easier to work. DO NOT use metal containers for your hat mold as they are liable to create rust stains on your hat during the drying process.
8 Comments
Leave a comment


Tanya
August 05, 2021
found it. the link is in the PDF, right? And the PDF for this is not out!!! a breeze blew thru my ears. Thanks…..