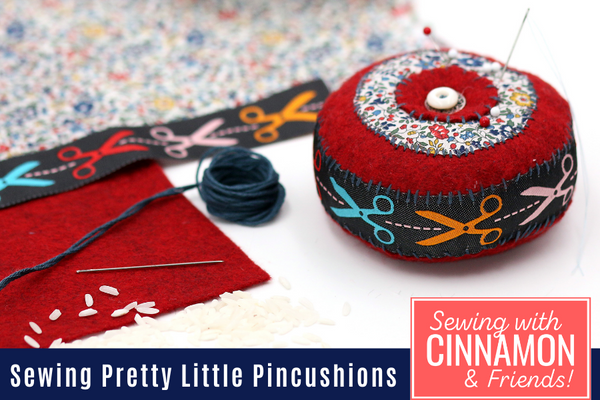
In Part 2, I’m going to show you how to make a darling little circle puff pincushion. In the process of creating this keepsake, we’ll brush up on a few hand sewing skills - the whipstitch and the satin stitch or buttonhole stitch. Once you make one, I’m sure you’ll be hooked and make many in different color combinations.
The highlight of this design is the use of ribbon around the sides of the pincushion. You can use a variety of ribbon types and designs. I'm using a 7/8" width ribbon from Renaissance Ribbons. It's from the Jessica Jones collection and features a cute scissor design that's woven into the ribbon. It coordinates with a Singer machine ribbon to make a cute set! Stay tuned for the next project to see how we used that ribbon too!
The supplies you need for this project are:
- Wool Felt
- Coordinating Woven fabric
- Embroidery Floss and thread
- Ribbon Trim, 3/4” -1” width
- A few buttons
- Poly-fill stuffing and rice
Here's a streamlined set of instructions to make the Circle Ribbon Puff pincushion. Follow along in the video to see each step in more detail.
- Cut two 3-1/4” circles from the wool felt - I used my Pumpkin Treat bag pattern piece as a template.
- Cut one 2” circle front the cotton fabric - I used the smaller circle from the same pattern.
- Cut one 1-inch circle front he wool felt (same color or a contrasting color). A spool of thread was the perfect size to make a template!
- First we’ll sew the cotton fabric to the center of the top of one large wool felt circle. You can use a machine satin stitch or zigzag OR you can hand stitch a tightly sewn (close together) satin stitch.
- Then place the small wool circle centered on top of the woven fabric. This fabric doesn’t fray so you can use the embroidery floss with each stitch spaced apart to give it a decorative finished look.
- Add the Button or charm to the top to finish it off.
- Using a whipstitch, sew the wool felt circle to the ribbon trim, when you get to the end, fold the edge under and sew the ends of the trim together for a nice finish.
- Bring in the bottom wool felt circle and using the same whipstitch, sew it to the bottom edge of the ribbon trim stopping with about two inches to leave an opening to add the stuffing.
- Fill it with poly fill and a mix of rice packed tightly.
- Then continue to sew the whipstitch to close the opening. Tie a knot, tuck it to the inside and your pincushion is finished!
If you need more in-depth instruction for sewing the basic hand stitches outlined in this post, be sure to check out our series of posts in Hand Sewing Mastery!
4 Comments
Leave a comment


Sandra Cox
October 15, 2021
Beautiful pin cushion! I’m going to have to get some nice ribbon to make one. Just one Question, What is the purpose of the rice added to the stuffing?