
Hi Everyone! This week we I'm excited to share my tips and techniques for sewing both slash pockets and patch pockets. Both styles are commonly found on jeans, but can be used in a veriety of othe garments. Watch the video below for an indepth look at sewing these types of pockets.
Week Two: Watch the video and then practice sewing either patch pockets, slash pockets, or both! You can use any of the pattern listed below or any pattern you'd like that uses patch pockets.
Pattern Overview: Below you'll find a list of the Liberty Jane patterns that include welt pockets in the design.
- Liberty Jane Moto Pants (available separately in several sizes - 18" AG Girl, 18" AG Boy, and 18" BFC Doll)
- Liberty Jane Jeans 18"AG, 18" BFC, 18" Journey Girls, 18" KNC, 14.5" WW, 14" HFHG, 16" Ellowyne, 16" AGAT, 15" Bitty Baby
- Liberty Jane Capri/Shorts (WW version)
- Liberty Jane High Waisted Jeans
- Liberty Jane Surfrider Sundress (Front Slash Pockets) 18" AG, WW version will be published this month!
- Liberty Jane Single Strap Overall Shorts 18" AG and 14.5" WW (coming soon!)
- Liberty Jane Coronado Shirtdress (Patch Pocket)
Resources (other tips & tricks):
Week One task:
- Using the pattern pieces from any of the mentioned patterns, cut out and sew a pocket. Don't feel you need to create an entire garment! The point of this exercise is to refine your skills :) You don't actually need to use the pattern pieces if you want to work with something larger to begin with.
- For a simple patch pocket exercise - follow the tutorial posted below to add a cute patch pocket to anything you'd like!
- Post questions as comments under this Facebook Group Post - please preface your question by stating the the pattern used if applicable. Post finished projects as well - we'd love to see them!
Next Tuesday - Week 2: Side seam (or hidden) pockets tips and tricks...
Bonus Patch Pocket Tutorial:

Patch pockets are ridiculously easy and versatile -- they're great for adding a pop of color (and functionality) to pants, skirts, shirts, and many other items. Today, we'll make two kinds of patch pockets; a quintessential patch pocket, and a novelty shaped pocket.
1. The Basic Patch Pocket
Figure out how large you'd like your pocket to be, then cut a rectangle of fabric that's 1/4" larger on the bottom and sides, and 1/2" longer along the top edge.
Press under the top edge twice, so that you have a 1/4" double turn hem. Then, edgestitch close to the folded edge to hold it down.

Press under the remaining three edges 1/4". Position your pocket, and pin it into place.
Edgestitch around the outer edges to finish.
If your pocket is going to get a lot of use, it's a good idea to reinforce the corners. Here's a little diagram that shows you how to stitch little reinforcing triangles at each upper edge of the pocket...

2. The Novelty Shaped Patch Pocket
But, you say, what about when you inevitably get bored of the basic, rectangular pocket? What if you want to try other shapes? Well, here's one way to get randomly (and delightfully) shaped patch pockets.
Cut out two identical pieces of fabric, in your desired shape -- be sure you add about 1/4" of seam allowance on all the edges. Lay the two pieces atop each other, with the right sides together, and stitch. Leave an opening at least 1" long somewhere near the bottom.
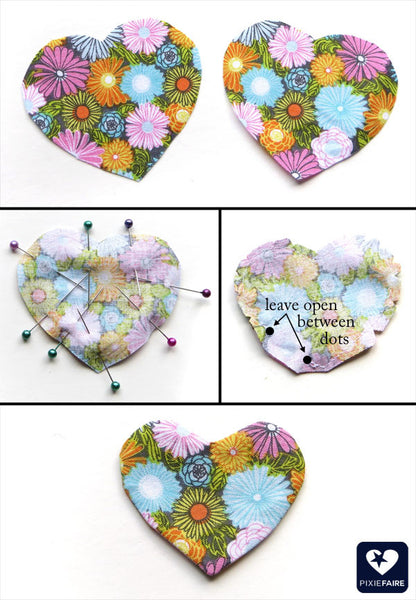
Clip into the seam allowance (curious? We give a few hints in this post) and turn your pocket right side out. Press it carefully, being sure to fold in the edges of the opening.
Then, all that's left is to place your pocket and edgestitch it down. Of course, where to start and stop stitching won't always be clear with this kind of pocket; the rules of thumb here are to make sure 1) your object can still fit into the pocket and 2) the stitching comes up high enough that the object won't fall out of the pocket :)

And there you have it! Congratulations!

4 Comments
Leave a comment


wendy hobaugh
June 06, 2021
I use quilter’s 1/4" basting tape for the edges and also cut a template (without seams) out of cardboard and shape the fabric to it….