

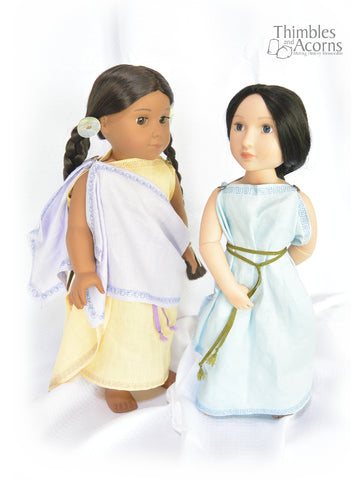
Transport your 18" doll back into ancient Greek times with this week's clever tutorial that comes to us from the very talented designer behind Thimbles and Acorns - Shari Fuller.
Giveaway update! Our winner is Diane O. who said she loves the Town Mouse and the Country Mouse fable. Congratulations Diane!
**********
The Dorian Chiton, pronounced KEY-tun, was the style of clothing worn by western Greek men and women. It was made from a single rectangle of cloth that was draped around the body and fastened at the shoulders with a pin, broach, or thorn. It was left open at one side and held together at the waist or just under the breast with a belt or tie.
Measurements are given for both 18-inch dolls such as American Girl® and the 16-inch A Girl for All Time® dolls.
Materials needed:Fabric ~ To make a full length Chiton, cut a piece of lightweight wool, linen, or cotton fabric 27-inches wide by 15-inches long for an 18-inch doll or 25-inches wide by 13.5-inches wide for a 16-inch. Wool was the most common fabric worn by Greeks, however, the more well-to-do liked to dress in imported cotton and linen fabrics. Working class men, soldiers, and young women often preferred shorter Chitons, so feel free to shorten your Chiton. Although most Greek statues give the impression that Chitons were usually white, bright natural colors and simple geometric prints were also worn.
Notions ~ One yard of ribbon or narrow cord for tie; two small pins, buttons, or snaps; optional, one to three yards of 1/4-inch to 5/8-inch wide trim.
Step 1: Finish the raw edges of the Chiton with a double-fold hem. Starting with the shorter sides, turn the edges under 1/4-inch and press to crease. Turn the edges under another 1/2-inch to encase the raw edges and press again. Pin in place and stitch close to the inside edges to secure. Repeat for the longer sides

Don't want to sew a hem? Trim the Chiton down to 25.5 x 13.5-inches for 18-inch dolls (23.5 x 12-inches for 16-inch dolls), finishing the edges with a pinking shears, serging, or by simply fraying them.
Step 2: The Chiton can be left plain or one or more edges can be decorated with a band of trim or embroidery. If your machine has embroidery stitches, this is a great opportunity to use them.

Step 3: Lay the Chiton lengthwise, right side up. Mark the top edge with pins 4.5-inches and 9-inches from each side. Apply buttons at the two markings on the left side. Following the instructions below, make button loops at the two markings on the right side.

Well-to-do Greeks fastened their Chitons with pins called fibulae or decorative broaches. Those that couldn't afford them used thorns that they boiled in oil to harden. Don't want to sew buttons or button loops? Fasten your Chiton with small safety pins or no-sew snaps instead.
Step 4: With the right sides out, fold the Chiton in half aligning the buttons with the button loops. Fasten the button nearest the folded edge to create an armhole.

Step 5: Slide your dolls left arm through the armhole and fasten the other button on the right shoulder. Arrange the free edges on your dolls right side so that they cascade neatly down the side.

Step 6: Overlap the ends of the Chiton on the open side and secure it at the waist with a ribbon or cord. Wrap the cord around the waist twice and tie it in the front to form a simple belt. For a more elegant look, wrap the cord around the torso, just under the arms, criss-cross down the front, wrap it around the waist, and tie it in front. Adjust the fullness of the Chiton around the torso as desired. Pull the front of the Chiton down slightly to help it drape under the neck.
Chitons were often bound at the waist with a double belt between which a section of cloth could be pulled out to create a kind of pocket to store and carry whatever items they needed.
The extra fullness of the Chiton could be handled any number of ways. The Greeks liked to wear their Chitons loose and billowy so feel free to pull and tuck your Chiton until you get the length and draped effect that you like.

Giveaway Time!
How would you like to win one of these elegant Chitons? Or better yet two?? Shari is giving away one Chiton and Himation set complete with hangers in both a 16" and 18" size to one lucky winner!
To enter, leave a comment below finishing this sentence:
"My favorite one of Aesop's fables is ..."
We'll pick a winner on Monday, May 30th, and get in touch via email. Thanks for entering and good luck!
For Pixie Faire,
Shari & The PF Team


106 Comments
Favorite is “The Lion and the Mouse”. Thank you for sharing this adorable pattern. My granddaughters are going to love it and so do I!
I grew up with all these stories and love reading them to the grandkids. What a great way to make some of them to come to life with the historical outfits. Love it wish I would have done something with the dolls before. The girls would like their dolls dressed this way. Keep up all the neat clothes.
My favorite fable is The Lion and the Mouse. I really enjoy your historical patterns!!
I can remember having a book of Aesop’s Fables as a child. I read through it regularly. There were so many good stories but my favourite was the hare and the tortoise. “Slow and steady wins the race”.
I have always liked the Aesop fable the “Grasshopper and the Ant.” I taught Latin and biological science for may years, and because of my interest in entomology and the wonderful translations of Aesop’s fables first into Latin, I was even able to share many of these edifying childhood favorites with my high school students. Being industrious seems out of style to many today but this fable will always carry it message in literature to other generations.