


This week, I show you how to add lacing to a basic tee! It's pretty quick to do, and gives your basic tee a fun "punky" look.
**UPDATE** Giveaway closed, thanks everybody for entering! Our winner is Donna, who said, "I think it would look great with a brown leather mini skirt and brown army boots." I agree, that would be pretty smashing! We'll be in touch with you via email soon, Donna :)
I'm starting with the Liberty Jane Off The Shoulder Tee, but you could definitely adapt this technique to work with an ordinary tee you have lying around.

If you're starting from scratch, like me, you'll need your cut out tee pieces. (Or, just grab your ready-made tee!) You'll also need some twill tape or ribbon, lacing, and tiny eyelets or grommets. You can usually find super tiny, 1/8" eyelets in the scrapbooking section of your local craft store.
OK! Step 1: cut your tee down. Take the front piece, and fold it in half along the Center Front (middle) line. Measure down 1/4". Then, draw a straight line across the top of the tee. It should be about 3/4" down at the other (shoulder) edge. Slice this section off.
Repeat with the back pieces. If you're using a ready-made tee, then just do your best to cut straight across the top.
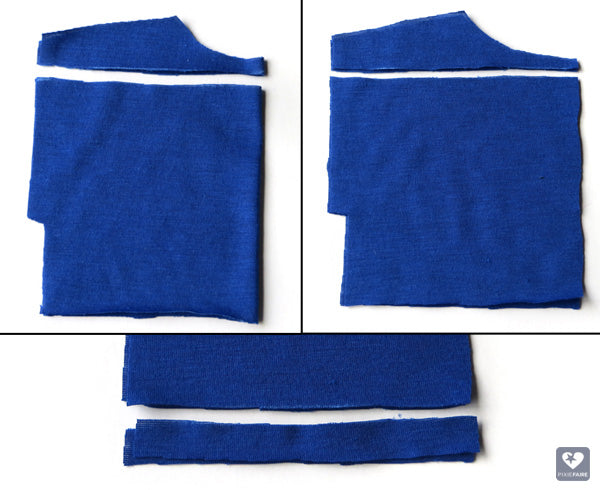
Because I wanted my tee to have even more of the "crop top" look than the original, I also sliced off about 1/2" from the bottom of both pieces.

Sew the backs to the fronts at the side seams, just like the directions in the pattern guidebook.
Here's where it gets fun!
Lay twill tape on top of the shirt, along the entire neckline edge. Make sure the RIGHT side (outside) of the shirt, and the RIGHT side of the twill tape or ribbon, are both facing UP.
Sew close to the bottom edge of the twill tape.

Flip the shirt over, and fold the extra shirt fabric down. Stitch to hold it in place, and then carefully trim away the extra.
Use pins to mark where you want to put the eyelets. Mine are about 7/8" apart. This spacing is up to you; just make sure the front and back eyelets will line up.
Here's a tip: once you have the eyelet positions just right, you can go back and mark them with a little tiny sharpie dot. That way you can take the pins out, and still have your markings perfectly intact.

Make a tiny hole at each spot -- you can use an awl (pointy metal tool) like in the picture, or a pair of sharp scissors. Just be sure to only cut a few threads. More than that, and your finished eyelet is likely to fall out (yikes!). Follow the directions on the eyelet package, to set them correctly.

Finish up the tee by adding velcro at the back, and staystitching the lower edge. (If you're using a premade tee, then you don't have to do this step -- wahoo!)

Run lacing through the eyelets, and tie it neatly at the ends. You may need to try the tee on your doll, to get the spacing just right.
And there you have it!

Giveaway time
Wanna win this tee? Super! We'd love to give it away to one lucky winner!
To enter, just leave a comment below, and "play stylist" as you finish this sentence:
"I think this tee would go great with...."
... a necklace of some sort? Giant blingy bracelets? Palazzo pants? Or maybe leather jeggings? So many styling options!
We'll run the giveaway through Monday, April 27, and get in touch with the winner via email.
Thanks everybody, and have fun with this!
For Pixie Faire,
Melinda


53 Comments
I think this top would go with mitered skirt.
I love this look. We can make it fancy or plain. Dress it up or dress it down.
I think this tee would go great with a gold locket and a gold bangle or two. Thanks for the awesome tutorial!
I think this top would go great with a pair of cuffed denim short shorts worn over a 2 piece swimsuit, flip flops and an oversize beach bag. Then head to the beach!
I think this tee would go great with a matching beach bag, and then wear it over a bathing suit.