


Winter is in full swing! The slopes are packed with snow which means it's time to get your gear together and head out to the mountains! Whether you're dreaming of being as great a skier as your favorite Olympic champion, or you're just in it to have fun & create lasting memories - we've got a tutorial you're sure to love! Follow along as we show you how to make skis and ski poles for your 18-inch doll!
There's a few pretty cool sets available from American Girl for skiing and snowboarding, but they don't ship to all countries and they seem to be frequently out of stock. We've got you covered, try this creative tutorial brought to you by @forofsuch today!
Supplies Needed:
- Yard stick or ruler
- Scissors
- Pencil
- Hot glue gun and glue
- Stick or craft glue
- Craft knife
- Self-healing mat or layers of cardboard
- Half inch wide elastic
- Pink craft foam
- Patterned scrap book paper
- Acrylic craft paints in pink and periwinkle
- Paint brush
- Paper plate and small dish of water
- 1/4 inch dowel
- Colored foam board (we used a scrap of turquoise foam board we had already)
- Wooden toy wheels with 1/4 inch hole (This is optional. You could also use bottle caps or some other round household item.)
- Doll boots or shoes of your choice

Step 1: Cut your colored craft foam into two pieces, each measuring 1.5 inches by 12 inches (you could also use white craft foam and cover the whole “ski” in patterned or solid scrap book paper).
Using something curved to trace around (we used the side of our glue bottle), draw a curved line at each end of each foam board piece and cut along this line using your craft knife.
Now you have 2 skis!


Step 2: Cut 4 pieces of craft foam measuring 1.5 by 4 inches each.
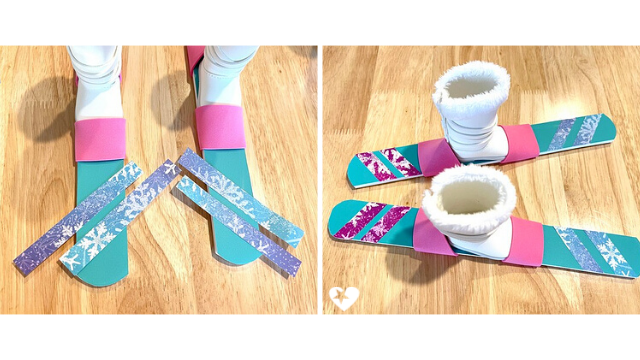
Take one of your doll shoes/boots, and place it in the center of one of the skis. Using 1 piece of craft foam, drape the craft foam over the toe of the shoe, only covering about ½ an inch of the end of the shoe, and, holding the shoe firmly in place, wrap the foam around the shoe and the ski, and hot glue the edges to the bottom of the ski. You want this piece to be a bit snug for the shoe, but not so snug you can’t get the shoe out. Also, you may need to trim your craft foam to fit in order to glue it down flush on the bottom of the ski.

Repeat this process for the heel of the shoe using another piece of craft foam. You will see from the photos that the foam pieces should be angled up a bit to cradle the shoe, while still allowing room for the shoe to be removed.

Step 3: Once the first ski is done, set the second ski next to it and the second shoe on the ski, lining up all the ski ends and the placement of the shoes before repeating step 2 to apply the remaining foam pieces to the second ski.

Now you have two skis ready to go, or you can take a few moments to decorate them in the next step!

Step 4: Using your patterned scrapbook paper, decide on a design for your skis. We cut strips of paper half an inch wide and laid them diagonally on our skis, glued them down, then trimmed them to fit. Then we repeated this on the back of the skis, changing up the diagonal direction. But you could do any kind of design you can think of! Cut out stars, hearts, snowflakes, or stripes!
After this, your skis are done and you can set them aside while we make the ski poles!
Step 5: To make the ski poles, first cut your dowel into two 13 inch lengths. We used craft scissors this time, but you can use a craft knife or small hand saw to do this.

Step 6: If you are using the small wooden wheels to make the tips for your poles, go ahead first and make sure the dowel pieces fit into the holes on them. We had to whittle our dowels down just a bit, but then they fit in tightly and securely.

(If you want to skip this step, you could wrap colored cardstock around the end of your poles, or paint the tips a different color than the rest of the pole, but you’ll do either of those options after the poles are painted.)
Next we paint! Separate your dowels and wheels, and paint them individually with your acrylic craft paint. (The small dish of water is to dip your brush in before you dip into the paint. Acrylic craft paints always paint better if you do this first!) We chose a periwinkle blue for the poles and a pink to match our craft foam for the wheels. Once they are painted and dry, you can reinsert the poles into the wheels. Ours fit tightly enough that we did not need glue, but you may want or need to glue yours in.

Step 7: Next we need to make the handles for the doll’s hands. Cut 2 pieces of elastic measuring 4 inches long each. Fold these in on themselves in thirds and hot glue the two overlapping ends together.

Now we need two more pieces of craft foam. Cut each of these to be 1 1/8 inch by 2 inches long.
Stick one piece of craft foam into each elastic loop you just made. Hot glue the foam to the elastic on one side only.

Lay one ski pole down into the center of the elastic with the craft foam sticking out on either side and hot glue this down. Make sure you have about 1 to 1/18 inches of ski pole remaining above this. Also make sure the free loop of elastic that is not glued to the craft foam is facing the table during this step.
The last step is to wrap the craft foam snuggly around the pole, one end at a time, and hot glue these ends down. Once the glue has cooled, your ski poles are finished!

Now your doll can hit the slopes in style! She’ll be confident to try new things using her new, made with love, ski equipment.

We'd love to see your creations too, so if you make one, please tag us on Instagram @PixieFaire and @forofsuch
You can also share pictures in the Pixie Faire Inspritation Gallery right here on the website, either use the #pixiefaire when posting on IG, or just click the little + box to upload your picture right here on the website!
Thanks everyone!
For Pixie Faire, @forofsuch
ENTER TO WIN A $50 Pixie Faire Gift Card!
To enter this week's contest, simply click the link below and then enter through the giveaway widget at the bottom of the blog post, there are many things you can do to earn multiple entry points!
Contest Details: You enter through the entry form that is embedded on this page and appears just below this paragraph, if you don't see it, be sure to visit the page from your desktop or an alternate browser such as Google Chrome. It may not appear on all mobile devices. The complete rules and entry details appear on the entry form. This is not a comment contest - in other words, leaving a comment on the bottom of this page is not an official entry method. The only required entry method is to leave a comment under this post and then confirm that you did it in the contest widget. One person will receive the PF Gift Card. You can enter once, or gain multiple entries by completing the other entry methods and increase your chances of winning. Please review all Terms and Conditions on the giveaway page before entering. While we wish we could run this contest everywhere, for legal reasons it is only open to eligible residents of the U.S. and Canada, not including Rhode Island. This contest is exclusively endorsed by Liberty Jane Clothing and Pixie Faire.
a Rafflecopter giveaway
Commenting below and confirming your entry in the widget above gives you one entry method, the other methods are listed in the widget above, be sure to enter in as many ways as you can to receive the maximum amount of entries to win the gift card!
(This post and giveaway are not endorsed or affiliated with American Girl®, no endorsement implied.)
We’d love to hear from you. Please leave a comment and tell us, Which would you rather - Hit The Slopes OR Sip Hot Chocolate in the Ski Lodge?


290 Comments
Sip hot cocoa while reading a book by the fireplace
I haven’t skied in many years, so I would first go and have some hot chocolate before trying my luck on the beginner slope.
Count me in for the hot chocolate!
I would like to hit the slopes like I did 50 years ago with my two boys and husband. I don’t know where the years h as be gone.
Sip Hot Chocolate in the Ski Lodge!