


Welcome to the wonderful world of baking buttons! In this tutorial, we will teach you to make your own one-of-a-kind tiny doll size buttons using shrink paper such as Shrinky Dinks®.
Be sure to read to the end and enter our giveaway for a chance to win the Button Making Bundle!
This tutorial was created by Chris Saunders of Love U Bunches and first appeared in the All Buttoned Up Pattern.
You only need a few supplies and a little bit of time to make unique-to-you designer buttons!
Let's talk about the supplies you will need:

- Shrinky Dinks® paper or Grafix® film (or shrink paper/film by another manufacturer). Paper (or film) comes in clear, frosted, opaque, and ink jet printer compatible. Quality and shrink results vary from brand to brand, especially the ink jet products. Please read product reviews before purchasing. Buy Shrinky Dinks® Paper Now
- Scissors or punches. Punches are nice to have and they guarantee a round shape for your button. They also come in a variety of shapes and sizes.
- 1/4" hole punch. You will need a regular hole punch to punch the buttonholes.
- Permanent markers. You do not want the color to fade or wash off. I used ultra fine permanent markers for outlines on small designs. If you are coloring in large areas, you will want a permanent marker with a wider tip.
- Sealant. For pieces that will be handled often. Designer note: I did not use sealant on any of my projects; however, it is a nice option to seal in the color.
- Parchment paper or heavy brown paper wrapping paper to place the buttons on for baking.
- Cookie sheet. The buttons must be on a cookie sheet. Baking in a pan with high sides (i.e., cake pan) will result in uneven heating and ill-shaped buttons.
- Small ceramic or glass bowl (or cup). It must have a flat bottom. Sometimes the buttons do not bake completely flat. You will use the bottom of the bowl to flatten them out.
- Oven (or toaster oven), cookie sheet, oven mitt. Shrink paper "bakes" at a relatively low temperature, but your hands will still need protection from the heat.
- Timer (optional). Follow the directions on the shrink paper packaging. Your buttons will be in the oven from one to three minutes.
Note: The following steps describe how to make round buttons that will end up being approximately 5/8" wide. They are a good size for the All Buttoned Up sundress; 3/4" buttons also look nice! You can use the same steps for any shape or size you desire! It's all up to YOU!
*****Please read through all of the directions before you start*****
Step 1: Practice

When working with shrink paper, what you see before baking is not necessarily what you get! Some colors get brighter when they shrink and some get darker. Take a moment and bake a color swatch. A thin, light layer of marker is best. If the ink is too thick, it will chip.
Step 2: Trace template onto shrink paper

Note: Templates can be downloaded from the All Buttoned Up Dress Pattern. Templates are a helpful tool to make your button making process go smoothly, but you can also make your own buttons just fine by carefully drawing the shapes you want based on the measurements given below.
Unless you want the traced outlines to show, use a pencil for tracing. Erase lines before baking.
Option A: For opaque paper
Cut out the 1.5" circle template, or create your own guide by measuring a 1.5" circle. Punch out the buttonholes and place the template on the shrink paper. Trace around it. Be sure to mark the buttonholes.
Option B: For clear or frosted paper
Place the clear/frosted paper over the button shape on the template page and trace the shape, or draw your own shape onto the paper. Mark the buttonhole locations.
Step 3: Get creative!

Using permanent markers, design and color your buttons. Remember, the buttons will shrink approximately 50%. Consider shrinkage as you design. Very detailed designs may lose their impact after they shrink.
If you are using frosted/sanded paper, draw on the rough side of the paper.
If you are using shiny/smooth paper, allow ink to dry before adding a second color ink.
Wet ink will smear.
Step 4: Cut out button

Cut or punch out your button and the button holes.
Don't forget the buttonholes! You cannot punch buttonholes after baking!
Step 5: Prepare for "baking"
Preheat oven to temperature recommended on the package. For my oven, I set the temperature at 300 degrees and baked for 3 minutes.
Place a piece of parchment paper on a cookie sheet and place the buttons on top of the paper. The colored side should be up.
Step 6: "Bake" your buttons

Put the cookie sheet with the buttons on it in the oven for the time recommended on the packaging. Place it on the middle rack. Time will vary based on your oven.
Check progress every minute or so. Use your oven mitt and remove the cookie tray from the oven at the recommended elapsed time or when they are flat. You may see them curl and jump around a bit. This is normal!
If your buttons are not completely flat when you remove them, use a small ceramic/glass bowl to flatten them out.
Reminder: The buttons will be hot when you remove them from the oven! They cool off quickly, but be careful not to burn yourself.
Step 7: Attach buttons
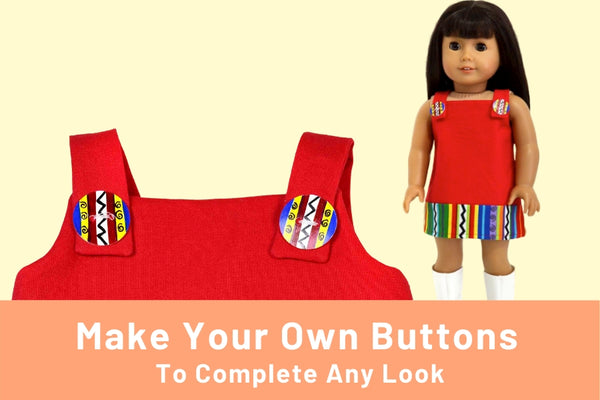
Sew your buttons onto your dolly garment and make something that is truly unique!
Shrink info: In general, your buttons will shrink anywhere from 30% to 50%.


Shop Our Pattern Collection for Sewing With Buttons

Now that you have learned to make your own buttons, unleash your creativity with our collection of patterns that feature buttons.
ENTER TO WIN the Button Making Bundle
To enter this week's contest, simply click the link below and then enter through the giveaway widget at the bottom of the blog post, there are many things you can do to earn multiple entry points!
The Button Making Bundle Includes:
- Shrinky Dinks® 10 Clear Sheets
- Shrinky Dinks® 6 Printed Patterns Sheets (stripes, polka dots, and more)
- 24 Fine Point Sharpie® Permanent Markers in "Electro Pop" Colors
- 1.5" Round Craft Punch
Contest Details: You enter through the entry form that is embedded on this page and appears just below this paragraph, if you don't see it, be sure to visit the page from your desktop or an alternate browser such as Google Chrome. It may not appear on all mobile devices. The complete rules and entry details appear on the entry form. This is not a comment contest - in other words, leaving a comment on the bottom of this page is not an official entry method. The only required entry method is to leave a comment under this post and then confirm that you did it in the contest widget. One person will receive the Button Making Bundle. You can enter once, or gain multiple entries by completing the other entry methods and increase your chances of winning. Please review all Terms and Conditions on the giveaway page before entering. While we wish we could run this contest everywhere, for legal reasons it is only open to eligible residents of the U.S. and Canada, not including Rhode Island. This contest is exclusively endorsed by Liberty Jane Clothing and Pixie Faire. Not endorsed by or affiliated with Shrinky Dinks®.
a Rafflecopter giveaway
We'd love to hear from you. Leave a comment and tell us - what kind of buttons would you like to make! Commenting below and confirming your entry in the widget above gives you one entry method, the other methods are listed in the widget above, be sure to enter in as many ways as you can to receive the maximum amount of entries to win one Button Making Bundle!
Thanks, everyone!
The Pixie Faire Team


256 Comments
I am the junior advisor for a West Michigan group of the Michigan button society. The kids have made polymer clay buttons and learned how to cover buttons with fabric they will love this!
Looks like fun; interesting button shapes are possible.
These buttons look like so much fun!! I remember using Shrinky Dink plastic when my daughter was small. Would love to use it again to make buttons.
It doesn’t matter what kind of button I make; I just love buttons!!!
So many applications using this process.