

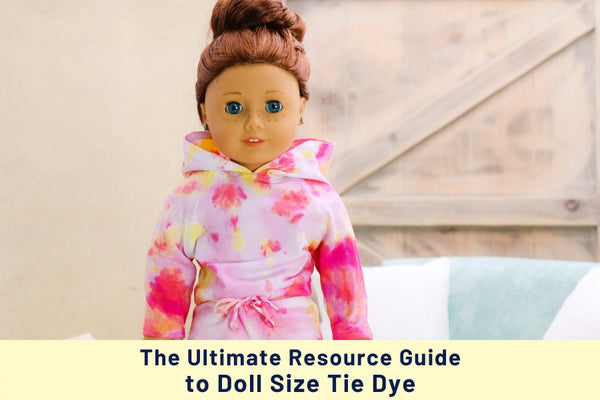
We've put together the ultimate resource guide to tie dyeing clothing for your dolls! We cover everything from choosing fabrics to folding techniques, and lots of other helpful tips. We've even included a few bonus pattern hacks!
Giveaway Alert! We're giving away one Tulip® 12-Color Tie-Dye Kit!
To enter the limited-time contest, be sure to scroll to the end of the post to leave a comment about which tie dye method is your favorite.
Choosing Fabric
Tie dyeing or other at-home dyeing works best with fabrics made from natural fibers, such as cotton, linen, or rayon. This is because natural fibers are more absorbent than synthetic materials, which are more likely to just repel the dye. For the examples in this post we have used woven rayon, an upcycled cotton jersey t-shirt, and a cotton spandex blend knit.
Choosing Dyes
For this project we experimented with dyes from a Tulip Tie Dye Kit, as well as Rit® all-purpose liquid dye. For the Rit® dye option we followed this tutorial where they explain how to mix their liquid dye for tie dyeing with the squirt bottle method.
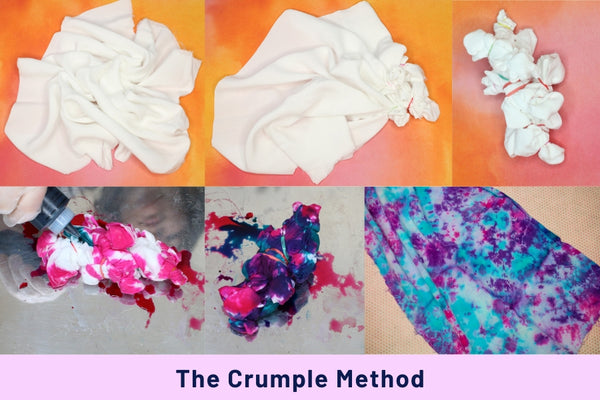
The crumple method is an easy tie dyeing technique to begin with because it relies on randomness for it's neat pattern, so it's hard to get wrong! This technique is great for a finished garment, as well as a cut piece of fabric, as shown above.
For the crumple method:
- Scrunch the fabric or garment together with your fingers.
- Begin securing small bunches of fabric together with rubber bands. Try to gather different areas of the fabric together in each bunch. Vary the sizes of each section to add more variety throughout the fabric.
- Continue tying off sections with rubber bands until the entire piece is crumpled together and secured.
- Wet the bundle of fabric, then apply dye. For a multi-colored look, apply each color to alternating bunches of fabric. Use like colors next to each other, as some blending of the colors will occur.
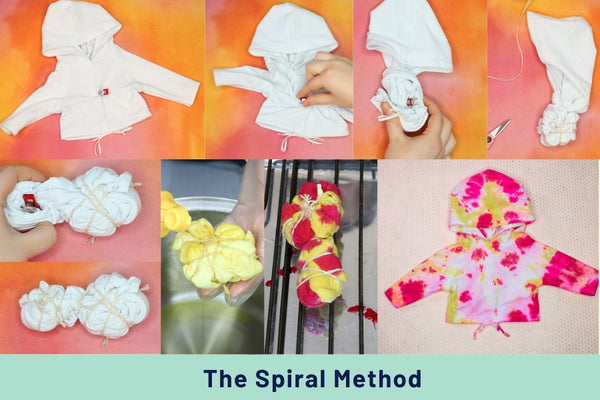
The spiral method is a classic tie dye look. For a doll-sized spiral, it's important to note that what might seem like a small amount of white space left undyed could look like a lot of white space on the doll. For a more defined spiral, be sure the dyes soak all the way in to the fabric and in every fold.
For the spiral method:
- Pinch the center of the garment with your fingers or a small clip.
- Twist the pinched fabric so the rest of the garment begins swirling around it.
- Twist the rest of the fabric around the center spiral until the entire garment is wound in one round spiral. For the above example, the body of the sweatshirt was wrapped on one spiral while the hood was wrapped in its own spiral.
- Tie the spiral together in a pie shaped pattern with twine or rubber bands.
- With the garment wet, apply two or more colors of dye in an alternating pattern in each pie shape. Flip the piece over to apply die to the back side as well.
Get the Pattern:
123 Mulberry Street Hoodie Dress
Get the look: Use the Hoodie length variation with no band. Add two holes to the center front on the hem and feed a cotton twill drawstring through the hem to create a drawstring hoodie.

Shibori is the name for traditional Japanese tie dye using indigo. If you are looking to read more about shibori and see more traditional tie dye techniques, this article from Heddels is an interesting read.
For the Shibori-Inspired Method:
- Use a pencil or other thin tube shape (such as a reusable straw, etc.) and roll the garment or fabric around the object. The direction you roll the garment will be the direction of the stripe pattern; rolling from top to bottom will create vertical stripes while rolling from side to side will result in horizontal stripes.
- Once all of the fabric is rolled onto the pencil, begin securing with rubber bands or twine. Secure all along the length.
- Wet the fabric, then apply one or more colors of dye until no white fabric is visible on the outside. For more defined stripes, leave a small amount of white around each rubber band.
Get the Pattern:
Liberty Jane Free T-Shirt Pattern For 14.5" dolls. 
Get the look: Add about 4-inches of length to the hem to create a fun and trendy t-shirt dress.
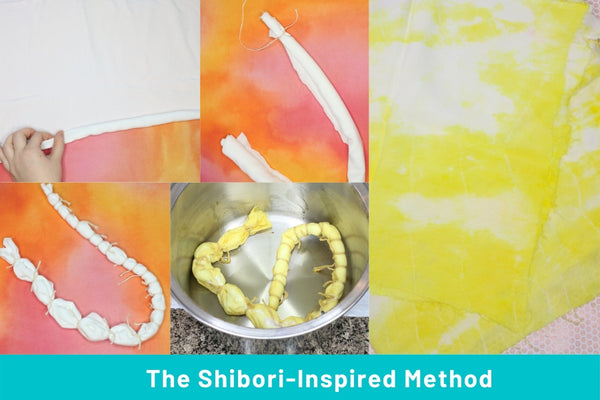
This method is similar to the one shown above, but it is applied to one cut piece of fabric rather than a garment. The effect is a kind of ombre stripe that we think would make a great dress for any doll.
For the Shibori-Inspired Method For Fabric Yardage
- For horizontal stripes, begin tightly rolling the fabric along the long end of the piece. For vertical stripes, begin rolling on the short end. Roll the piece of fabric all the way to the end to form one rolled tube-shaped piece.
- Tie the roll with rubber bands or twine all along the length.
- Wet the roll of fabric, then apply dye. For more defined stripes, leave a small amount of white around each rubber band.
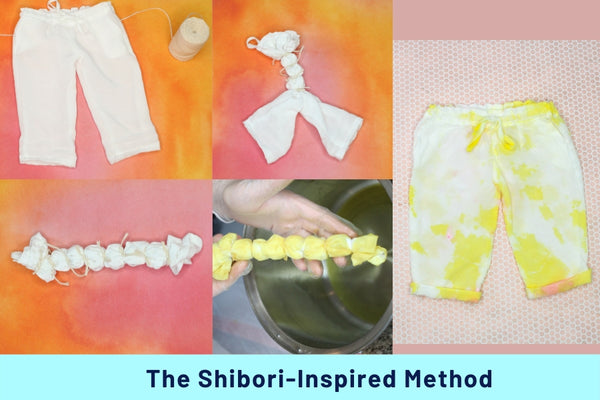
Similar to the method above, the shibori-inspired technique we used for these pants is super simple and creates a casual and carefree look.
For this version of the Shibori-Inspired Method:
- Lay the garment flat on the work surface. Starting at the top, bunch together the fabric in one horizontal line and tie off with a rubber band or twine.
- Continue banding the fabric by horizontal bunching at regular intervals.
- Wet the fabric, then apply one or more colors of dye. To create more prominent stripes, be sure to thoroughly saturate the fabric with dye so that color is applied to the entirety of the garment, rather than just the surface of the bundle.
Get the pattern:
Liberty Jane Drawstring Shorts 
Get the look: Add length to the hem to make cute and comfy drawstring pants. Get access to the full tutorial for this project in Sewing With Cinnamon. This month our topic is Sewing the Themed Wardrobe: So-Cal Style!
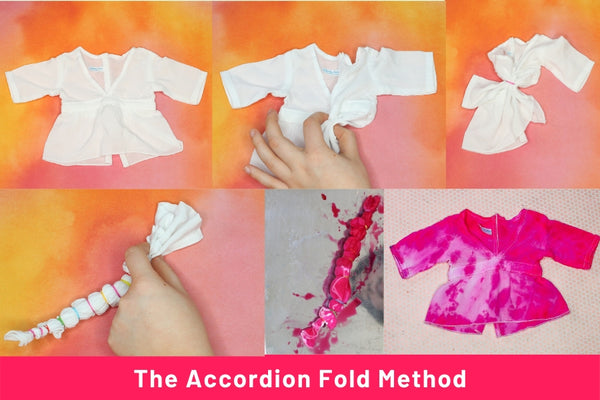
The accordion fold tie dyeing technique creates a beautiful stripe pattern that is perfect for a more sophisticated tie dye look. Tip: the smaller you make your folds, the more intricate the pattern will look. You can also fold in a different direction other than a diagonal line to create your own unique look.
The other method we used for this example was an ombre effect created by applying one layer of dye to the entire garment, then a second layer to the top 2/3 of the folded piece, then a final third layer to the top 1/3 of the piece. This created a subtle gradient affect that is easy to achieve.
For the accordion fold method:
- Starting in one corner of the garment or piece of fabric, begin making small accordion folds in the fabric in a diagonal direction.
- Continue folding until your diagonal line reaches the opposite corner of the garment. Secure this spot with a rubber band or twine.
- Continue folding and tying the rest of the garment in the same diagonal direction until all the fabric is bundled in one tube shape.
- Wet the roll of fabric, then apply dye. For a more defined pattern, leave a very small amount of white around each rubber band.
Get the Pattern:
Liberty Jane Lightning Ridge Top

Waiting, Rinsing, and Drying
For drying times and methods, it's best to follow the instructions on your dye kit. Our kit recommended to wrap the piece in plastic and let the fabric sit for 6-8 hours. Then, rinse the piece well until the water runs mostly clear. We also hand washed the pieces with clear detergent to make sure all the excess dye was removed, then ran through the tumble dryer for 20-30 minutes.
Washing and drying the doll size pieces helps to give them a great warn-in look and softer feel- just like you want with tie dye pieces!
WARNING: Once your garments are ready for wear, be careful not to leave the dolls dressed in the dyed pieces for too long at one time, as it is possible some excess dye will stain the vinyl skin.
The possibilities are endless...
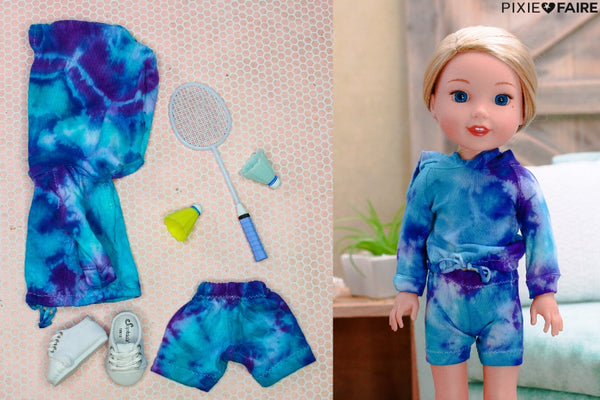
This example shows the 123 Mulberry St. Hoodie Pattern For 14.5-inch dolls made using the same drawstring hem method mentioned above. We used the spiral method and applied blue and purple dye. For the trendy biker shorts, we made the Liberty Jane leggings pattern as a shorts length, then dyed using the crumple method.
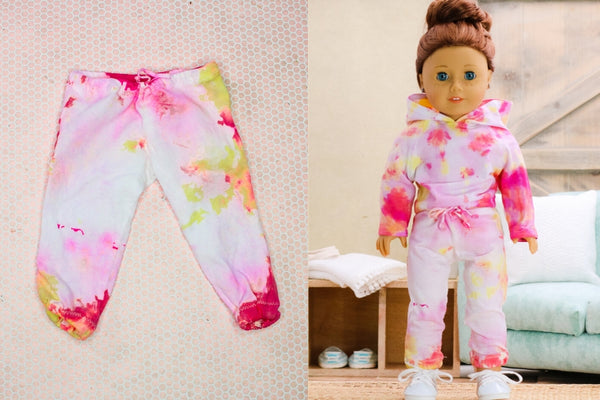
For an easy sweatpants pattern hack, here we made the basic pants pattern from Liberty Jane, adding a drawstring through the waistband rather than elastic, and adding elastic bands at the hem of each leg. These were dyed using the crumple method and make such a cute matching set with our drawstring hoodie!
ENTER TO WIN A Tulip® DIY Tie Dying Kit
To enter this week's contest, simply click the link below and then enter through the giveaway widget at the bottom of the blog post, there are many things you can do to earn multiple entry points!
Contest Details: You enter through the entry form that is embedded on this page and appears just below this paragraph, if you don't see it, be sure to visit the page from your desktop or an alternate browser such as Google Chrome. It may not appear on all mobile devices. The complete rules and entry details appear on the entry form. This is not a comment contest - in other words, leaving a comment on the bottom of this page is not an official entry method. The only required entry method is to leave a comment under this post and then confirm that you did it in the contest widget. One person will receive the tie Dye Kit. You can enter once, or gain multiple entries by completing the other entry methods and increase your chances of winning. Please review all Terms and Conditions on the giveaway page before entering. While we wish we could run this contest everywhere, for legal reasons it is only open to eligible residents of the U.S. and Canada, not including Rhode Island. This contest is exclusively endorsed by Liberty Jane Clothing and Pixie Faire. Not endorsed by or affiliated with Tulip®.
We'd love to hear from you. Leave a comment and tell us - which tie dye method is your favorite! Commenting below and confirming your entry in the widget above gives you one entry method, the other methods are listed in the widget above, be sure to enter in as many ways as you can to receive the maximum amount of entries to win one Tulip® 12-Color Tie Dye Kit!
Thanks, everyone!
The Pixie Faire Team


243 Comments
The spiral method seemed to be working pretty well, but it’s really fun to keep trying different methods. The pink outfit turned out really cute. Thanks for the opportunity and inspiration.
I would like to try them all! I love tye dye!
I haven’t tried to dye but would like to
I like the crumple method the best. I’d love to try it out. I’ve always done the spork. It’s time to try something different.
My five year old granddaughter says she likes the crumple method and since the dolls are hers, that is the final answer. Someday Nebraska will have some warm spring weather and perhaps we can get outside. I am still quarantined (9 weeks now), since I am still doing chemotherapy for my ovarian cancer. It is messing with my brain, so we will put off sewing until I’ve been off the major drugs for a while.