


Hi, Everyone! Are you ready for another pattern hack of the free trendy t-shirt? This one is perfect for summer, it's easy to make, and it's doable in a variety of sizes - yay! This tutorial is brought to you by our fabulous content creator @graceloves2bake, read on to follow along as she shows us how to make a Wrap Dress from the Free T-Shirt Pattern.
I don't know about you, but I LOVE t-shirt dresses! I usually wear mine with sneakers and a jean jacket or a cardigan and sandals. This dress is made with the Trendy T-shirt pattern which is free on Pixie Faire! It slips on your doll feet first, meaning no closures in the back!
What you will need:
- Liberty Jane Free Trendy T-shirt pattern
- Knit Fabric
- Paper
- Ruler
- Scissors
- Tape

Step 1: Go ahead and print and cut out your pattern pieces. Trace the front pattern piece on your paper and then flip the pattern piece over face down as shown in the picture below. Measure and mark one inch below the armhole (¾ for RRFF). Trace from the mark down to the bottom right hand corner of the pattern piece. Using your ruler, draw a straight line from the shoulder seam to the mark you made on the side.Erase the unnecessary lines. Using your ruler, add three inches to the side seams of the piece (3 inches for RRFF as well). Connect the two lines at the bottom. This is now your pattern piece for the front of the dress.

Step 2: Take your back pattern piece and tap it to a piece of paper. Add three inches to the length just as you did with the front. Draw a straight line for the bottom of the piece as well. (I learned this technique from previous Pixie Faire tutorials.) I also added some arrows to indicate that I will be cutting this out on the fold.

Step 3: Now it’s time to cut out your dress! You should have two front pieces, two sleeves, and one back piece.

Step 4: Sew your shoulder seams together. Turn the entire neckline under ¼ of an inch and hem. Hem your sleeves and sew them onto the dress just as directed in the pattern instructions.

Step 5: This part is a bit tricky to put into words, but as long as you follow the pictures it should be easy! It is time to sew up the side seams. Start by lying the doll’s left front side of the dress face up. Then place the left side of the crossover piece on top, also right side up. Next, put the dress’ back left side seam on top, right side down and sew.
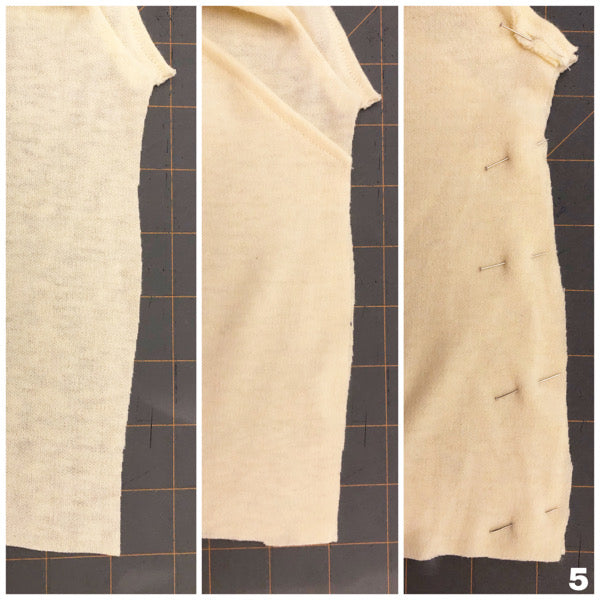
Step 6: Now it is time to sew the other side seam. Line the sides up right sides together just like you would if you were sewing the t-shirt. Then lay the crossover top, right side down and sew.

Step 7: Hem the bottom of the dress making sure the front has a double layer. I only turned up the hem once due to the thickness of the front of the dress.

This general idea can work for any of the free t-shirt patterns, you'll just need to adjust the measurement to be appropriate for the doll size. Below is a cute picture of the new 12" Siblies doll (from Ruby Red) wearing a dress made just for her too! Stay tuned next week as we begin posting patterns for the dolls and post a full doll review & giveaway too!
We'd love to see your creations too, so if you make one, please tag us on Instagram @graceloves2bake @PixieFaire
You can also share pictures in the Pixie Faire Inspritation Gallery right here on the website, either use the #pixiefaire when posting on IG, or just click the little + box to upload your picture right here on the website!
Thanks everyone!
For Pixie Faire, @graceloves2bake

ENTER TO WIN A $50 Pixie Faire Gift Card!
To enter this week's contest, simply click the link below and then enter through the giveaway widget at the bottom of the blog post, there are many things you can do to earn multiple entry points!
Contest Details: You enter through the entry form that is embedded on this page and appears just below this paragraph, if you don't see it, be sure to visit the page from your desktop or an alternate browser such as Google Chrome. It may not appear on all mobile devices. The complete rules and entry details appear on the entry form. This is not a comment contest - in other words, leaving a comment on the bottom of this page is not an official entry method. The only required entry method is to leave a comment under this post and then confirm that you did it in the contest widget. One person will receive the PF Gift Card. You can enter once, or gain multiple entries by completing the other entry methods and increase your chances of winning. Please review all Terms and Conditions on the giveaway page before entering. While we wish we could run this contest everywhere, for legal reasons it is only open to eligible residents of the U.S. and Canada, not including Rhode Island. This contest is exclusively endorsed by Liberty Jane Clothing and Pixie Faire.
a Rafflecopter giveaway
We'd love to hear from you. Leave a comment and tell us - How would you style this darling new dress?
Commenting below and confirming your entry in the widget above gives you one entry method, the other methods are listed in the widget above, be sure to enter in as many ways as you can to receive the maximum amount of entries to win the gift card!
(This post and giveaway are not endorsed or affiliated with American Girl®, no endorsement implied.)


226 Comments
I am looking forward to trying this hack!
I would use a small, floral print for the dress. Then I would top it off with either a crocheted or knitted bolero to match, but contrast the dress. Then I’d add strappy little sandels to complete the outfit! Thanks for your giveaways!
What an ingenious idea to convert the T-shirt pattern into a wrap dress! I have a 2 1/2 year old granddaughter- and would have to make a wrap dress for her new dolly. it would be easy for her to put on the doll when made of knit fabric. and to style this outfit- i would make a little cross body bag for dolly to wear with her new dress.
So cute!
Cute! Thank you!